Capture the Moment
There is no doubt that professional photographers have an amazing talent and uncanny ability to capture the essence of their subject. This beautiful art form preserves history, sells products and can produce profound emotion without saying a word. Hiring a professional photographer is a real treat, though we are not always able to do so.
Luckily for us, gaining access to a camera is much more readily available nowadays through the use of cellphones, a small point-and-shoot camera, or larger models. In light of the last month of summer, I thought it would be nice to provide some tips that might help to give your final summer photos a little extra spark. These guidelines are easy to incorporate into your everyday photos, and enhance the overall experience.
1. Focal Point – It is important to choose a focal point for your image, this is the main point of interest in the photograph that draws the viewer’s eye in. Without this, the image tends to get distracting, confusing and starts to blend together.
2. Foreground – While expansive landscaping is impressive in person, it tends to lose a little something when transferred to photo. Liven up your landscape by finding something in the foreground to draw the viewer’s attention (Focal Point). Not only will the foreground make the image more interesting, it also helps illustrate depth.
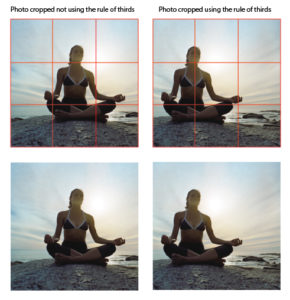
3. Rule of Thirds – Imagine a photograph being broken down into a 3×3 square grid. When thinking of your composition, position the subject in such a way that it falls onto one of those imaginary grid lines or intersections as opposed to the center. While there are exceptions to the rule (perhaps a singular flower or portrait shot), the idea here is that a photograph tends to look more pleasing, interesting and natural when it is off center.
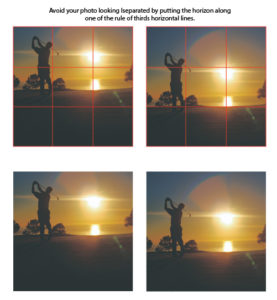
4. Horizon Line – When considering the rule of thirds, it is also good to keep the horizon line in mind. Try to place the horizon along the top or bottom third of your photo instead of directly in the middle of the picture. By centering your horizon, the photo appears split in two instead of having a flow to it.
5. Juxtaposition –Try to photograph something from an unexpected angle to give the subject more interest. For example: a bird’s eye view of the city or a worm’s eye view of a person. Experimenting with different angles can lead to some pretty interesting photos as well as just being a lot of fun.
6. Eye Contact – Play with eye contact. Instead of having your subject look directly into the camera, see how a shift in the direction of someone’s eyes can affect the message of the picture or tell a story.

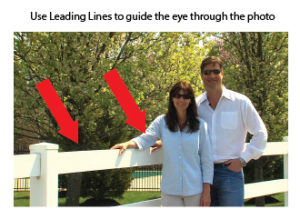
7. Leading Lines – Leading lines are natural lines found within the photo that guide the eye through the picture as well as give a sense of depth to the image. Leading lines are all around you and they don’t have to be straight. Some examples of Leading lines are:
- Shoreline
- Railroad Tracks
- Road
- Line of trees
- Fence
- Pathway
- Buildings
- Mountains
- Rivers
Determine your strongest lines and decide how you can use them to enhance your image and composition.
8. Series Shots – Try using a burst setting that will snap multiple pictures in a row creating a sequence. This can be especially helpful when capturing moving objects, children and pets. Additionally, it looks pretty cool to have a framed sequence to hang up instead of just a singular static image.
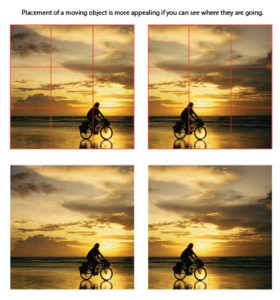
9. Movement Shots – When considering the composition of a moving object, it’s often more pleasing to the eye if we can see the implied location the object will end up. For example: If you take a photo of a car driving down the road, people tend to want to see where the car is heading instead of the road behind it. It adds a sense of movement and anticipation.
10. Candid Shots – Try to snap pictures of your friends and family when they don’t realize they are being photographed instead of having them pose. This is a great way to capture natural reactions and honesty.
11. Shadows – Playing with shadows in a photograph can add another level of interest. It can add power, mystery or drama. Adding different amounts of light and shadow can give your photo a whole new look or meaning.
12. Natural Lighting – Typically, the best times to photograph outdoors is around sunrise or sunset when the sun is not directly above your subject. A harsh light can lead to harsh shadows on the face. If you can’t make it out at these times, play with the direction of light to get different effects on your subject or even find a bit of shade to balance out the sunlight.
Photo Presentation and Enhancements:
Now that you’ve taken a bunch of new photos, what do you do with them? One option, instead of the standard print and put into an album or frame, is scrapbooking. Traditional scrapbooking is a great way for you to get crafty. You can find supplies including different types of papers, stamps, embellishments and scissors as well as ideas or books on the matter at just about any craft store in your area. In addition to traditional scrapbooking, there are also a wide variety of digital scrapbooking sites that give you a similar look without the mess. Here are a few to get you started:
- http://www.artscow.com/photo-books
- https://www.shutterfly.com/photo-books
- http://www.smilebox.com/scrapbooks/free-digital-scrapbooking.html
- http://www.snapfish.com/photo-gift/photo-book
If you’re looking to just make adjustments to the look of your photo, there is a variety of photo editing software available as well. Here are a few options:
- http://www.gimp.org/
- http://photoscape.en.softonic.com/video/photoscape-introduction-to-photoscape-209
- http://www.adobe.com/products/photoshop-elements/features.html
With these types of editing software, you have the opportunity to alter your photos. Remove red eye, experiment with black and white or sepia tones, adjust the brightness and contrast or even add some interesting filters.

Hopefully these tips will spark some ideas the next time you set out to capture your lasting memories. Keep in mind, these are only suggestions and rules are meant to be broken. The best thing you can do is to experiment with your camera and most importantly, just have fun.